

How Mugs Are Kiln Fired: A Hobbyist's Guide
Kiln firing is defined as a controlled, two-stage heating process that transforms raw clay mugs into durable, waterproof ceramics with a finished glaze surface. The mug firing process follows two distinct phases: bisque firing at cone 04 (approximately 1063°C / 1945°F) and glaze firing at cone 6 (~1222°C / 2232°F) or cone 10 (~1315°C / 2400°F). Each stage serves a specific purpose. Bisque firing hardens the clay and prepares it for glazing. Glaze firing melts the glaze into a permanent, glass-like coating that makes the mug food-safe, waterproof, and visually finished. Understanding how mugs are kiln fired gives you the knowledge to control quality at every step, from raw clay to the mug you hold every morning.
How mugs are kiln fired: the bisque firing stage
Bisque firing is the first of the two essential firings in ceramic mug production. It converts greenware (unfired, bone-dry clay) into a hardened, porous form called bisqueware. The standard bisque firing targets cone 04, which sits at approximately 1063°C / 1945°F, and takes 8–12 hours to complete. That duration is not arbitrary. Slow, controlled heating gives moisture and organic materials time to escape without cracking the clay body.
Before loading mugs into the kiln, they must be completely dry. Any residual moisture trapped inside the clay will turn to steam during firing and can shatter the piece. Drying times vary by clay thickness and studio humidity, but most potters allow at least 24–48 hours of air drying before bisque firing begins.

The bisque stage removes chemically bound water from the clay molecules, a process called dehydroxylation. This permanently strengthens the ware and makes it safe to handle without smudging or warping. The resulting bisqueware is still porous, which is exactly what you want. That porosity allows glaze to adhere evenly to the surface before the second firing.
The bisque firing sequence step by step
- Bone-dry check. Confirm mugs are fully dry. Cold spots on the clay surface indicate moisture.
- Kiln loading. Stack mugs carefully on kiln shelves. Bisqueware can touch lightly, unlike glazed pieces.
- Slow ramp phase. Heat the kiln slowly to around 120°C / 250°F to drive off any remaining surface moisture.
- Quartz inversion phase. Hold or slow the ramp near 573°C / 1063°F. Silica crystals shift structure at this point, and rapid temperature change here causes cracking.
- Cone 04 target. Bring the kiln to full temperature and hold briefly to ensure even heat penetration.
- Controlled cool-down. Allow the kiln to cool naturally. Do not open the lid until the temperature drops below 93°C / 200°F.
Pro Tip: Program your kiln controller with a slow ramp of no more than 100°C per hour during the first two hours. Rushing this phase is the single most common cause of bisque cracks in hobbyist studios.
How does glaze firing work for mugs?
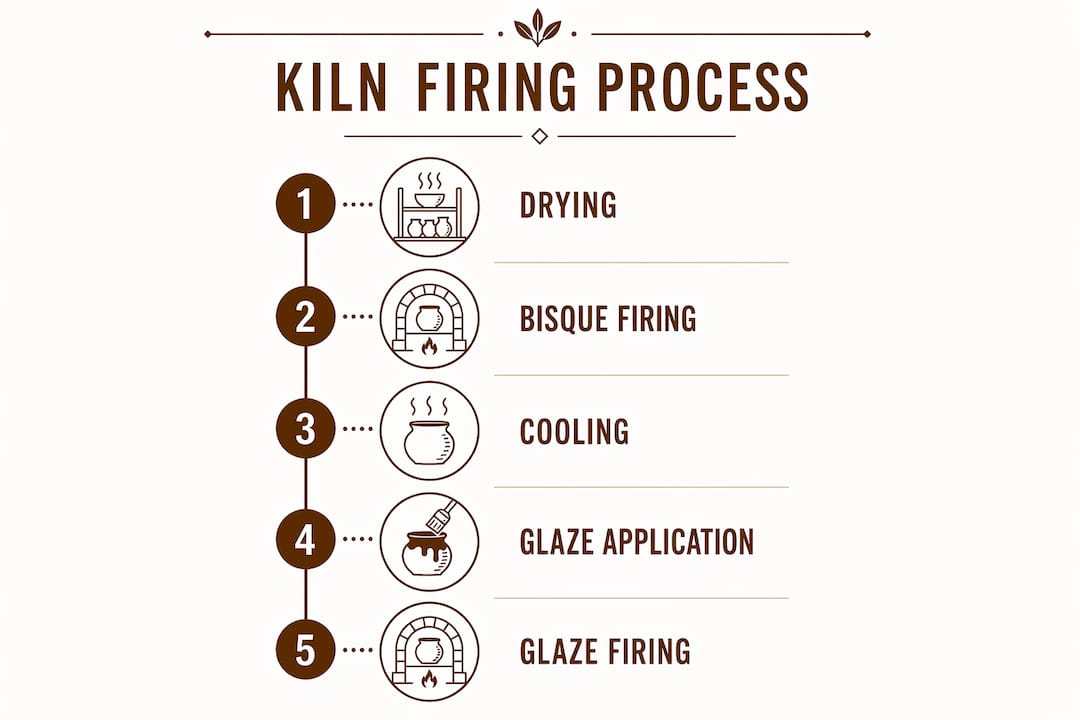
Glaze firing is the second and final stage of ceramic mug firing. It melts the raw glaze minerals into a permanent, glassy coating that bonds chemically to the clay body. Glaze is a molecular glass formed from silica, alumina, and flux at high temperatures. Underfiring leaves ceramics porous and unsafe for regular use, which is why reaching the correct cone temperature is non-negotiable.
Two temperature ranges dominate glaze firing for mugs:
- Mid-fire (cone 6, ~1222°C / 2232°F). The most common range for hobbyists. Electric kilns handle cone 6 well, and a wide range of commercial glazes are formulated for this temperature.
- High-fire (cone 10, ~1315°C / 2400°F). Produces denser, more vitrified clay bodies. Often used with stoneware and requires a gas or wood-fired kiln. The results from high-fire stoneware mugs are notably harder and more chip-resistant.
- Firing atmosphere. Oxidation firing (electric kilns, open oxygen flow) produces bright, consistent glaze colors. Reduction firing (gas kilns, restricted oxygen) creates unpredictable, often dramatic color shifts by chemically altering metal oxides in the glaze.
- Glaze thickness. Glaze thicker than 2mm will blister or run off the mug during firing. Dipping a bisqueware mug for 2–3 seconds produces the correct coverage for most commercial glazes.
- Firing schedule precision. The kiln must hold at peak temperature long enough for the glaze to fully mature. Cutting the soak time short leaves a matte, underfired surface even if the cone appears bent.
Pro Tip: Fire a small test tile with every new glaze batch before committing full mugs to a firing. Glaze colors and textures shift with kiln position, atmosphere, and even seasonal humidity. Physical samples are the only reliable approval standard.
How should mugs be loaded and managed in the kiln?
Kiln loading is where many hobbyists lose otherwise good mugs. Pieces must not touch during glaze firing because molten glaze will fuse them permanently. A minimum spacing of 5–10mm between mugs prevents this. Handles require particular attention. Position handles away from kiln walls and other pieces to reduce thermal stress on that vulnerable joint.
Digital kiln controllers are the most reliable tool for managing firing schedules. They allow you to program precise temperature ramps, holds, and cooling rates. Manual kilns rely on the potter watching witness cones, which works but introduces human error.
| Firing phase | Temperature range | Critical action |
|---|---|---|
| Moisture evaporation | Room temp to 120°C / 250°F | Ramp slowly; remove all surface moisture |
| Quartz inversion | 573°C / 1063°F | Slow ramp to prevent silica cracking |
| Bisque peak | ~1063°C / 1945°F (cone 04) | Hold briefly for even heat penetration |
| Glaze maturation | 1222–1315°C / 2232–2400°F | Soak 10–20 minutes at peak temperature |
| Controlled cool-down | 600°C to 200°C / 1112°F to 392°F | Slow cooling to prevent thermal shock cracking |
Controlled cooling through the 600°C to 200°C range is as critical as the firing ramp itself. Rapid cooling in this zone causes thermal shock, which produces hairline cracks called dunting. These cracks may not appear immediately but will worsen with use.
Pro Tip: Never open the kiln lid to “check” during firing. Every peek drops the temperature unevenly and can crack mugs near the opening.
How long does the full mug firing process take?
The complete mug-making process spans 1–14 days from raw clay to finished piece. Most of that time is drying, not firing. Stoneware shrinks 12–14% from wet clay to final fired product, and rushing the drying phase causes warping and cracking before the mug ever reaches the kiln.
Here is a realistic timeline for a hobbyist:
- Throwing and shaping. 1–2 hours per mug on the wheel or by hand.
- Leather-hard stage. 12–24 hours of air drying. Attach handles at this stage.
- Bone-dry stage. 24–72 hours of continued drying. The mug must feel room temperature, not cool, to the touch.
- Bisque firing. 8–12 hours in the kiln, plus cool-down time (typically 8–12 additional hours before opening).
- Glazing. 1–2 hours for dipping, brushing, or spraying, plus 1–2 hours drying time.
- Glaze firing. 8–24 hours depending on kiln size, cone target, and programmed schedule.
- Final cool-down. 8–12 hours before the kiln is safe to open.
Total active kiln time runs 16–36 hours across both firings. The waiting between stages is where patience becomes the most important skill in a hobbyist’s toolkit. Skipping or shortening any drying phase is the fastest way to ruin a mug you spent hours making.
What does firing do to mug durability, safety, and appearance?
Firing to mature temperature makes a ceramic mug fully vitrified. Vitrification means the clay particles fuse together at the molecular level, creating a dense, non-porous body. A properly fired ceramic mug will not absorb water, will not harbor bacteria, and will hold up to daily dishwasher use.
The glaze layer adds a second layer of protection. Firing melts the glaze into a permanent, waterproof surface that is chemically bonded to the clay. This bond is what makes glazed mugs food-safe and easy to clean. Underfired glaze, by contrast, remains slightly porous and can leach minerals into beverages over time.
Firing atmosphere directly shapes the final look of the mug. Oxidation firing produces predictable, bright colors. Reduction firing pulls oxygen from metal oxides in the glaze, creating earthy, mottled, or flashed effects that cannot be replicated in an electric kiln. The final fired appearance cannot be confirmed from digital designs alone. Physical test samples remain the only reliable way to approve a glaze color or texture before a full production run.
Common firing defects and their causes:
- Pinholes. Caused by gases escaping through glaze too quickly. Fix: slow the firing ramp near peak temperature.
- Crawling. Glaze pulls away from the clay surface. Fix: apply glaze to a clean, dust-free bisqueware surface.
- Blistering. Glaze bubbles and does not heal. Fix: reduce glaze thickness or extend the soak at peak temperature.
- Warping. Mug base or walls distort during firing. Fix: load mugs level on flat kiln shelves and avoid uneven heat zones.
- Dunting cracks. Hairline fractures from thermal shock. Fix: program a slow cooling ramp through the 600°C to 200°C range.
Key Takeaways
Kiln firing mugs requires a precise two-stage process, bisque firing at cone 04 and glaze firing at cone 6 or cone 10, with controlled loading, temperature ramps, and cooling to produce durable, food-safe ceramics.
| Point | Details |
|---|---|
| Two-stage firing process | Bisque firing hardens clay at cone 04; glaze firing matures the glaze at cone 6 or cone 10. |
| Temperature precision matters | Underfiring leaves mugs porous and unsafe; overfiring causes glaze to run or blister. |
| Kiln loading prevents defects | Keep 5–10mm gaps between glazed pieces to stop them from fusing during glaze firing. |
| Cooling is as critical as heating | Slow cooling through 600°C to 200°C prevents dunting cracks and thermal shock damage. |
| Test before committing | Fire glaze test tiles before full batches; physical samples are the only reliable approval method. |
What I’ve learned from years of watching mugs come out of the kiln
The most common mistake I see hobbyists make is treating the kiln like an oven. You set it, walk away, and expect consistent results. Kiln firing does not work that way. Every kiln has hot spots and cool zones. A mug placed near the element fires differently than one in the center of the shelf. I learned this the hard way after pulling an entire batch of mugs with underfired glaze on one side and blistering on the other.
The second lesson took longer to accept: glaze results are not predictable from a color chart. The same glaze can fire to a matte gray in reduction and a glossy teal in oxidation. I keep a firing log now, noting kiln position, cone target, atmosphere, and glaze thickness for every batch. That log has saved me more mugs than any single technique.
My honest advice for hobbyists is to fire small. Load four mugs, not forty, until you know your kiln’s behavior. Document everything. Adjust one variable at a time. Patience in this craft is not a soft skill. It is the technical foundation that separates a cracked, pitted batch from a shelf of mugs you are proud to use every day.
— Kristopher
Mugs worth firing up your morning routine
If the craft behind ceramic mugs has you thinking about what goes inside them, Dkbeanleaf has you covered on both fronts.

Dkbeanleaf’s white glossy mug is a clean, well-fired ceramic piece built for daily use. The glaze finish is smooth, food-safe, and dishwasher-ready. It is the kind of mug that makes you appreciate what a proper kiln firing actually produces. Pair it with a selection from Dkbeanleaf’s tea collection and you have a morning ritual worth repeating. Whether you are a hobbyist who fires your own pieces or someone who simply loves a great mug, Dkbeanleaf offers quality that reflects the craft behind every cup.
FAQ
What temperature is used to kiln fire mugs?
Bisque firing targets cone 04 at approximately 1063°C / 1945°F. Glaze firing runs at cone 6 (~1222°C / 2232°F) for mid-fire clays or cone 10 (~1315°C / 2400°F) for high-fire stoneware.
How long does it take to kiln fire a mug?
Bisque firing takes 8–12 hours, and glaze firing takes 8–24 hours depending on kiln size and cone target. Both firings require additional cool-down time before the kiln can be safely opened.
Why do mugs need two firings?
The first firing (bisque) hardens the clay and creates a porous surface for glaze to adhere to. The second firing (glaze) melts the glaze into a permanent, waterproof coating that makes the mug food-safe and durable.
What causes glaze defects like pinholes or crawling?
Pinholes result from gases escaping too quickly through the glaze during firing. Crawling happens when glaze is applied to a dusty or oily bisqueware surface and pulls away from the clay during the melt.
Can you fire a mug only once?
Single-fire techniques exist, where raw glaze is applied to unfired greenware and fired once to cone temperature. Single firing requires precise glaze formulation and careful handling, since unfired clay is fragile. Most hobbyists use the two-fire method for more consistent results.